Saturday 28 September 2013

Birdy book

Had an hour or two spare today, so I had a play with machine embroidery. I've made notebook covers before, but only with patchwork, but I see more covers with pictures coming soon!

P1040092

I make my covers using pretty much the same method as Rachel at Stitched In Colour - a link to her tutorial is here.

The colours in these photos aren't great (summer's over!) - this blue cover is a deep turquoise, and the bird's wing deep pinky-purple. These notebooks are about A5 size. I've added a ribbon bookmark with a felt ball on the end. In fact seeing the bag of felt balls, which I've had for months but haven't got round to using (but they're lovely to play with - get yours from Blooming Felt), inspired me back into notebook-covering.

P1040094

Next time I'm going to use Bondaweb to make sure there's not so much fraying on the bird shape - this time I used my standby Pritt stick. Well, it works!

P1040096

Watch this space for more notebooks soon x

Sunday 15 September 2013

Not orange peel - quilted, finished, loved

At last, it's done!  I've finished machine quilting Not Orange Peel, and am really, really pleased with it!
Here are a few pics taken when I'd finished the quilting but before I'd trimmed and bound the edges.

P1030920

The quilting pattern was inspired by a tree, with branches flowing and dividing organically. It starts in a bottom corner, and flows up and across the quilt, curving right back on itself at the bottom and the right edges. I quilted with Guterman 100% cotton, as I couldn't get to the quilt shop to get a big reel of anything like Aurifil.

P1030925

Here's the back, which is my favourite Flea Market Fancy print, plus a rainbow border made from one piece of every colour I used on the front.

P1030930


P1030921

And here's the binding, ready to go on - lovely pale spots! (it's a print I used in the background of the front quite a bit)

P1030931

To follow very soon - pics of the completed quilt (just as soon as I can get it away from my daughter's bed, it was made for her and she really loves it already - what more could I ask?)

Tutorial: easy box corners

You know when you want to give your bag/purse/pouch a bit of depth at the bottom, you have to make that seam across the corner? And you know what it's like trying to fiddle around matching up the seams so it looks neat, sticking a pin through, wiggling it about a bit, making sure there's not a pleated-up bit on the other side.....well now you don't need to do all that.  Here is my way of making boxed corners.

1) Sew your side and bottom seams as normal. If you're leaving a gap in the bottom seam for turning, make sure you've left enough room for the box corner seam.

2) Mark a square on each corner that you want to box.  To work out the size of this square, first calculate how long you want the finished box seam to be - let's say you want an 8cm seam.  This will be split between the two sides of the bag, so that's 4cm each side. Then take off your seam allowance, say 1cm, and you're left with the square size - in this case 3cm. See the diagram below! Mark this accurately (e.g. with a grid ruler) using a fading or washable marker or a pencil.


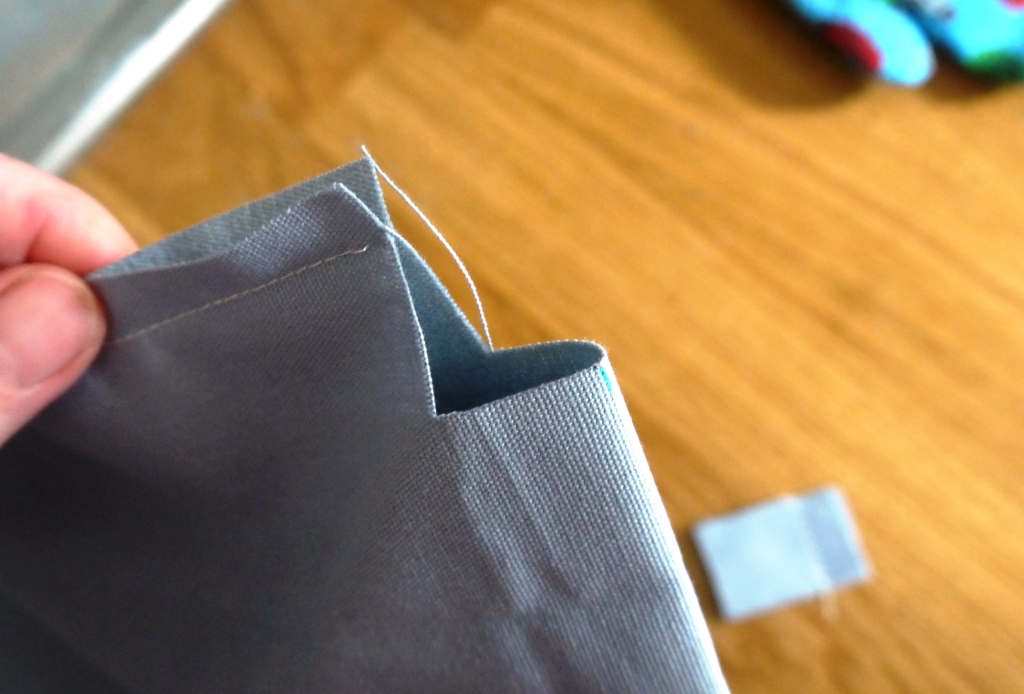
3) Get your sharp scissors out. Making sure your sewn piece is lying nice and flat, chop out this marked square - eek! A hole in your bag!!

4) Now pull the sides of the bag apart, so the seams meet (or seam and centre bottom fold in my case). Finger press seams open, check they match a little further down by peeking in, pin in place, then finger press the 45 degree fold at each edge.


5) Stitch across the raw edges you just cut and pinned, using 1cm seam.  Your corner is perfectly boxed!


Related Posts Plugin for WordPress, Blogger...